This standalone Digital Music player is the successor to my first Raspberry Pi-based digital audio project, and it was intended as some kind of evolution. Player #1 was running Squeezelite (later already Volumio, but merely as a test setup), so it needed a server or NAS to be running in order to play music. I’m not interested in playing music over the network – instead I wanted a standalone digital audio solution without the need to start/shutdown additional network devices each time I want to listen to music.
Player #2 will be implemented in two stages: The first stage will contain the fully functional player with local usb storage and an I2S DAC. The second stage will add a Tube CD filter based on a circuit published in the german DIY Hifi magazine „Klang & Ton“ in 1994 ( modern player tech meets oldschool tube circuitry). The Tube CD filter is intended to filter out high frequency noise leftovers from the DAC. I rather consider the filter to be some kind of additional/optional sound „flavour“, I’m not too strict regarding „sense“ or straightforward design. BTW, the circuit design of the filter ist very, very similar to this one. Honi soit qui mal y pense…
These were my requirements when designing the concept:
- High quality playback of audio files
- Volumio as software/OS, Raspberry Pi as hardware
- Flac files stored on local usb medium
- Inbuilt power supply with linear regulation
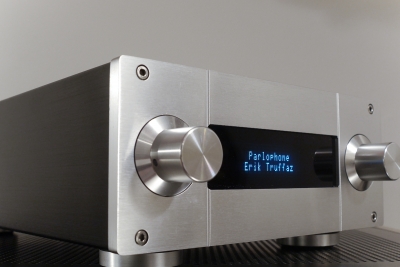
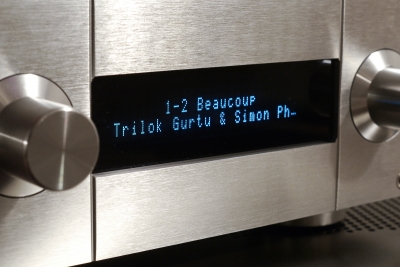
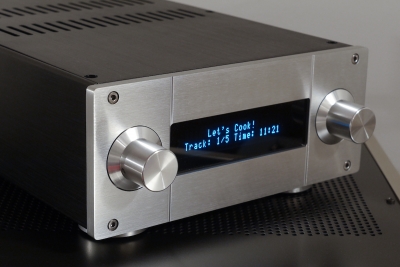
- A display showing basic info about the currently playing song/artist
- Basic remote control functions (play, pause, next, etc.) incl. shutdown option; all enhanced control functions like artist/playlist selection will be performed using the volumio web interface, or maybe by using mpd-compatible apps like „mpdroid„
- Appealing, living room compatible appearance
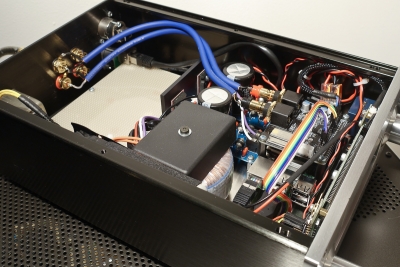
I did some web reading and (to cut it short) finally dicovered audiophonics.fr, some french guys designing/selling DIY Hifi components, with an emphasis on digital products. I chose the I-Sabre DAC ES9023 TCXO for the Raspberry 2 (read about USB vs. I2S on the Raspberry Pi here); the sound quality of the ES9023 is reported to be very good, and the DAC board offers GPIO passthrough, so further periphery devices (ir receiver, dot matrix display) can be easily connected.
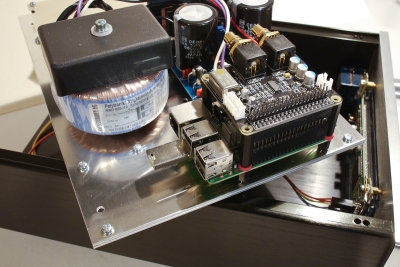
Audiophonics offers other nice components, like power supply regulators and aluminium chassis. To save some time and have a cleaner layout, I ordered some LT1083 regulator boards; these deliver power for the Raspi, the usb storage, the display and – later on – for the tube heaters (my design has a minor flaw concerning the heater voltage; more on that later). The regulators get their AC supply from a 50VA torrodial transformer with two secondary wirings.
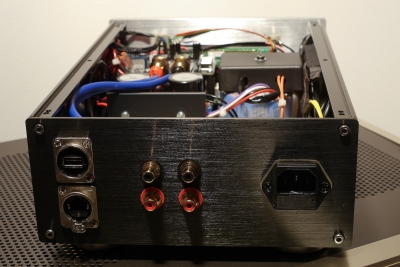
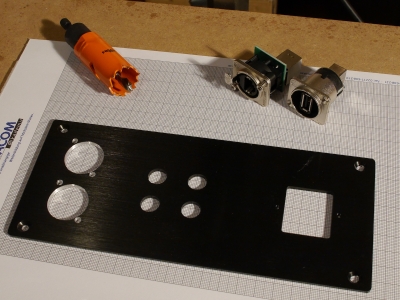
I also opted for a chassis that suited my needs – there is quite some space required for all these components. Furthermore, I wanted a chassis that already had a suitable cutout for the display. The two knobs will control power on/off and the tube output volume. On the back, there are suitable cutouts for power and audio connections (2 x stereo, DAC direct and tube output). I only had to drill adequate cutouts for the Neutrik USB and LAN connectors, this can be seen on one of the pictures.
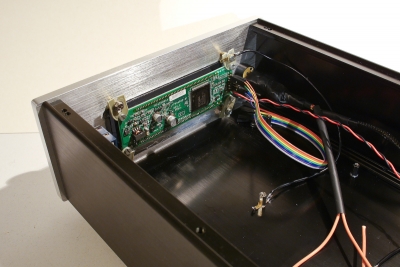
The dot matrix VFD has been recycled from a very old project. It is a very nice diplay (much sharper than LCDs, also with a greater viewing angle) with 24×2 chars/lines and a HD44780 compatible controller. The display is connected to the Raspberry in 4bit parallel mode.
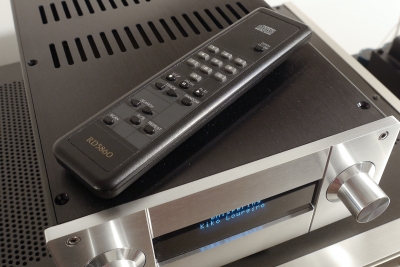
The IR receiver is a TSOP38238. This device can be directly connected to the GPIO port. LIRC ist installed as software; I had to fiddle around with the correct GPIO ports and LIRC instructions – there are a lot of instructions on the web that show you how to setup and configure LIRC (which is a nice support), but you have to read 3 or 4 of them to get a complete picture… Find one of the nicer ones here. The RD5860 remote is from an old Philips CD player, you can even find a pre-configured lirc config file for this remote; the chassis feet have also been recycled from this player.
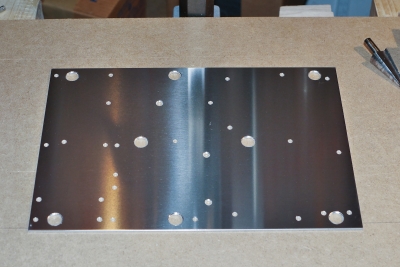
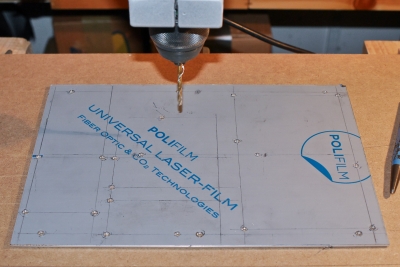
All hardware components have been mounted on an additional 2mm aluminium board. I did not want to drill that many holes directly into the chassis. I ordered two boards (one spare), and later on decided to use both boards, which resulted in a very solid 4mm base. This base also serves as a heatsink for the voltage regulators. You can see that in stage 1 there is quite some space left in the back – this is where the Tube CD filter will fit in in stage 2.


The Volumio OS is currently installed in version 1.55. A newer version with major modifications is already available on volumio.org, but I decided to stay with the older version, get everything up and running (lots of things to be figured out) and then later on try the stable 2.x release. On top of Volumio there is (as already mentioned) LIRC for IR remote control and the Adafruit LCD library (Adafruit_Python_CharLCD) written in python for display control. You also need the GPIO library to access the GPIO port in python.
My python script for reading song/artist info from mpc (mpc ist the command line application which is used to control the Music Player Daemon [mpd]) and writing this info to the VFD display is a heavy modification of a script taken from this page. I stripped it down to a very basic version (song/artist/track number/total play time/some status info) in order to reduce cpu load and because I wanted a preferably calm and simple presentation of the basic data on the VFD display in addition to the complete info on the Volumio web interface. I also implemented some optimizations in the code, e.g. introduce sigterm handling (when shutting down the script), allow german special chars on the display („umlaute“, considering the custom character table of the Futaba display) , center text on the display, etc. This is the current version of the script:
#!/usr/bin/python
# -*- coding: utf-8 -*-

import subprocess
import textwrap
import time
import signal
import sys

import Adafruit_CharLCD as LCD

# Raspberry Pi gpio pin configuration
lcd_rs        = 5
lcd_en        = 6
lcd_d4        = 17
lcd_d5        = 23
lcd_d6        = 24
lcd_d7        = 27
lcd_backlight = 26

# define LCD column and row size for LCD
lcd_columns = 24
lcd_rows    = 2

# init the LCD using the pins above
lcd = LCD.Adafruit_CharLCD(lcd_rs, lcd_en, lcd_d4, lcd_d5, lcd_d6, lcd_d7, lcd_columns, lcd_rows, lcd_backlight)

def sigterm_handler(signal, frame):
  lcd.set_cursor(0,0)
  line1 = ('      Volumio 1.55      ')[0:lcd_columns]
  line2 = ('    shutting down...    ')[0:lcd_columns]
  lcd.message(line1 + '\n' + line2)
  sys.exit(0)

signal.signal(signal.SIGTERM, sigterm_handler)

def replace_specialchars(message):
  try:
    # message = message.encode('utf-8')
    message = message.replace('ä', chr(228))
    message = message.replace('ö', chr(246))
    message = message.replace('ü', chr(252))
    # message = message.replace('Ä', chr(196))
    # message = message.replace('Ö', chr(214))
    # message = message.replace('Ü', chr(220))
    # message = message.replace('ß', chr(223))
    # message = message.replace('°', chr(223))
    # message = message.replace('µ', chr(228))
    # message = message.replace('´', chr(96))
    # message = message.replace('€', chr(227))
    # message = message.replace('–', '-')
    # message = message.replace('“', '"')
    # message = message.replace('”', '"')
    # message = message.replace('„', '"')
    # message = message.replace('’', '\'')
    # message = message.replace('‘', '\'')
    # message = message.replace('è', '232');
    # message = message.replace('é', '233');
    # message = message.replace('ê', 'e');
    # message = message.replace('á', '225');
    # message = message.replace('à', '224');
    # message = message.prelace('â', 'a');
  except:
    return message;
  return message

def main():

  # print welcome message
  line1 = '      Volumio 1.55      '
  line2 = '  initializing system   '
  lcd.message(line1 + '\n' + line2)

  # create custom char (...) = three dots in one character
  char_threeDots = [0b00000,0b00000,0b00000,0b00000,0b00000,0b00000,0b10101,0b00000]
  # create in ram position 0
  lcd.create_char(0, char_threeDots)

  # wait 2 seconds
  time.sleep(2.0)

  # clear display and turn on backlight
  lcd.clear()
  # lcd.backlight(lcd.ON)

  songArtistPrevious = ''
  stoppedSet = 0
  z = 0

  while True:
    # get current status and playtime
    process = subprocess.Popen('mpc', shell=True, stdout=subprocess.PIPE)
    status = process.communicate()[0]
    statusLines = status.split('\n')

    # check if mpc returns more that one line plus an extra
    # in that case we dont have stopped the music and can parse additional data
    if len(statusLines) > 2:
      # extract the song name / artist name (first line)
      # web radio has station name before artist / song
      songArtist = statusLines[0]
      if ":" in songArtist:
        songArtist = statusLines[0].split(':',1)[1].strip()
      if ":" not in songArtist:
        songArtist = statusLines[0]

      # extract player status (playing/stopped)
      infoPlayerStatus = statusLines[1].split(' ',1)[0].strip()

      # check for song change; only write new data to display
      # if there is a change cause this is nicer to cpu
      if songArtist != songArtistPrevious:
        songArtistPrevious = songArtist
        stoppedSet = 0
        z = 0

        infoArtist = songArtist.split(' - ',1)[0].strip()
        # shorten artist name if longer than lcd_columns
        if len(infoArtist) > lcd_columns:
          infoArtist = (infoArtist)[0:lcd_columns - 1] + '\x00'
        # center
        while len(infoArtist) < (lcd_columns -1):
          infoArtist = ' ' + infoArtist + ' '
        infoArtist = infoArtist + '        '

        infoSong = songArtist.split(' - ',1)[1].strip()
        # shorten song name if longer than lcd_columns
        if len(infoSong) > lcd_columns:
          infoSong = (infoSong)[0:lcd_columns - 1] + '\x00'
        # center
        while len(infoSong) < (lcd_columns -1):
          infoSong = ' ' + infoSong + ' '
        infoSong = infoSong + '        '

        # extract a string like '2:01/3:43 (54%)'
        # from the string '[playing] #2/8   2:01/4:38 (50%)'
        infoLine = statusLines[1].split(']',1)[1].strip()
        # remove first character ('#')
        # format aftwerwards: 2/8   2:01/4:38 (50%)
        infoLine = infoLine[1:]
        infoTrack = infoLine.split(' ',1)[0].strip()
        infoTimes = infoLine.split(' ',1)[1].strip()
        # split of (50%)
        infoTimes = infoTimes.split('(',1)[0].strip()
        infoTotalPlaytime = infoTimes.split('/',1)[1].strip()

      # toggle artist / track info
      if z > 40:
        z = 0

      if z == 0:
        # show song title and total play time / track
        lcd.set_cursor(0,0)
        line1 = (infoSong)[0:lcd_columns]
        line2 = ('Track: '+infoTrack+' Time: '+infoTotalPlaytime)[0:lcd_columns]
        while len(line2) < (lcd_columns -1):
          line2 = ' ' + line2 + ' '
        if infoPlayerStatus == '[paused]':
          line2 = '    [playing paused]    '
        # clean special chars
        line1 = replace_specialchars(line1)
        # line2 = replace_specialchars(line2)
        lcd.message(line1 + '\n' + line2)

      if z == 10:
        # show song title and artist
        lcd.set_cursor(0,0)
        line1 = (infoSong)[0:lcd_columns]
        line2 = (infoArtist)[0:lcd_columns]
        # clean special chars
        line1 = replace_specialchars(line1)
        line2 = replace_specialchars(line2)
        lcd.message(line1 + '\n' + line2)

    else:
      # message when stopped
      # set message only once, not in a loop (cpu friendly)
      if stoppedSet != 1:
        lcd.set_cursor(0,0)
        line1 = ('      Volumio 1.55      ')[0:lcd_columns]
        line2 = ('   [no music playing]   ')[0:lcd_columns]
        lcd.message(line1 + '\n' + line2)
        songArtistPrevious = ''
        stoppedSet = 1

    # sleep 0.5s
    time.sleep(0.5)
    z += 1

if __name__ == '__main__':
  main()
There is also a small modification to the Adafruit LCD library: I added brightness control for the VFD display (config is hardcoded in the library). This is a special feature of some VFDs, you can adjust brightness in four degrees; this is done by setting additional bits during display initialization:
# Brightness of Futaba VFD display
# Set to 100% for LCD displays

# 100%
# LCD_BRIGHTNESS = 0x00

# 75%
LCD_BRIGHTNESS = 0x01

# 50%
# LCD_BRIGHTNESS = 0x02

# 25%
# LCD_BRIGHTNESS = 0x03
Then in the init procedure of the library („__init__“) you have to modify the following line for the brightness setting to take effect:
# Initialize display control, function, and mode registers.
[...]
self.displayfunction = LCD_4BITMODE | LCD_1LINE | LCD_2LINE | LCD_5x8DOTS | LCD_BRIGHTNESS
The Flac files are stored on an SSD USB disk connected to the Raspi. The disk has its own power supply. The USB2SATA controller is taken from an external USB drive; this controller is my second shot – the first controller had been recycled form a very old external USB drive, and it resulted in stuttering music playback; it took me some time and nerves to figure out the cause of this problem! With the SSD, there are no moving parts in the player, so it is absoutely silent.