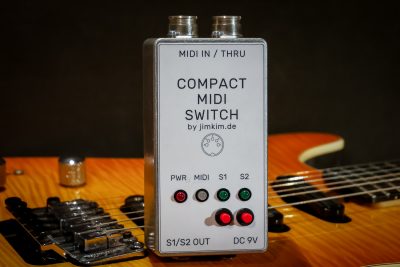
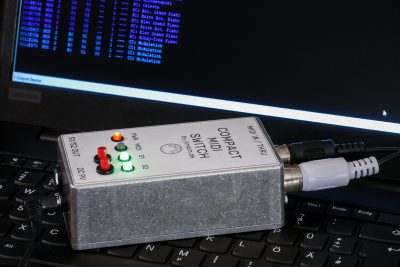
Compact Arduino MIDI Switch
This is basically a simplified and very compact version of the 8 Channel MIDI Switch. The Compact MIDI switch has two channels/switch outputs with relays and can replace footswitches of non-MIDI gear. So if you can connect a conventional footswitch to your gear, then you can most likely also control that gear with this MIDI switch and easily make it MIDI-controllable or midify your DIY gear. The switch can receive program change messages as well as control change messages (as an option). See it in action in this video:
You have to configure some basic settings in the source code before uploading the Ardunio sketch to the Arduino (Nano) board (get the Arduino IDE for free from arduino.cc). You can enable/disable program change and control change messages, define the MIDI channel and set a fixed controller number for each output, e.g. controller number 28 = output #1 and controller number 64 = output #2. If you then send a controller value < 64 for controller number 28, output #1 will be switched off; a controller value >= 64 will switch it on.
// MIDI Switch Light v1.0
// 2021-02-25
// Arduino MIDI switch by jimkim.de
// https://www.jimkim.de
// This MIDI device can receive MIDI program change and control change messages
// For each program (preset) the 2 outputs can be individually set (settings are saved to non volatile memory)
// Additionally, a MIDI controller can be assigned to each output (e.g. controller number 4 --> output 1)
// Controller values from 0-63 will switch off the output, values from 64-127 will switch it on
// Program change function and control change function can be globally enabled / disabled in the setup

byte programChangeActive = 1;     // switch listens to program change messages (0 = OFF, 1 = ON)
byte controlChangeActive = 1;     // switch listens to control change messages (0 = OFF, 1 = ON)
byte setMidiChannel = 1;          // MIDI channel (1 - 16)
int ctrlNumberSwitch1 = 51;       // MIDI controller number assigned to switch #1
int ctrlNumberSwitch2 = 52;       // MIDI controller number assigned to switch #2
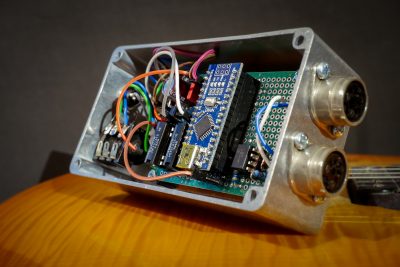
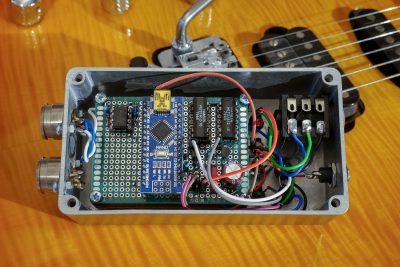
The compact MIDI switch can be build on tagboard and fits into a Hammond 1590N1 enclosure (121x66x39mm). This also depends on the relay type and size you are using. Make sure that the relays of your choice do reliably work with 9V (there is some voltage drop due to the protection diode and switching transistors). I used Hamlin reed types with 12V coil voltage (HE721A12, simply because I had them lying around, and they fit into 14pin DIP sockets); these work from 7V upwards. If you use 6V types, consider putting current limiting resistors in series with the relay coils. Of course you can also build a dedicated power supply, but the basic idea is to power the device from regular pedal power supplies for matters of simplicity.


Usage with program change messages: Send a program change command on the MIDI channel that has been set in the source code. The MIDI led will light up shortly and the outputs will switch to the settings that have last been saved (these maybe random after first programming). Now set the outputs with switch #1 and switch #2 (short press). When done, press switch #1 for about 2 seconds to save the settings for this program number. The MIDI led will light up 3 times to confirm that the current settings have been saved.
You can use MIDI control change messages to set each single output within a MIDI program/patch, or of course to exclusivley control the MIDI switch with CCs. Send a controller value in the range of 0-63 to switch the output off, and a value in the range of 64-127 to switch it on.
The source code will be available soon.
Hi,
I cannot see any relays in the pictures. Are they external in your build? I guess this design could be extended for more loops?
Hi,
I cannot see any relays in the pictures. Are they external in your build? Do you have the source code available? I’d really like to build this one!
Hi Mikko, are you referring to the compact midi switch on this page? You can see the relais in the build pictures (DIP reed relais) as well as in the schematic. If you need more loops, the 8 channel Arduino MIDI Switch would be the way to go: https://www.jimkim.de/guitar-projects/arduino-midi-switch/
Hello, great job! This is exactly what I need to use an audio relay on the input of my Kemper Profiler to automatically switch between electric guitar and acoustic guitar depending on the rig! Can you tell me when the source code will be available? Thanks a lot and best regards, Wolfgang
Well, I was thinking about putting up a donation page / download page first to get some return on investment 😉 But I’m extremely busy at the moment, so many things to manage. Drop me a mail (see imprint), I will send you the current code and you might report back if it is working for you and send some pictures of your build.
Hello,
are your Compact Arduino MIDI Switch available for selling? I would be interested.
Thank you.
Hi Frederico, no, this project is strictly DIY. The source code will be available for download for a small fee.